Singularity Global Client: Amazon S3
This is the client for interacting with Amazon S3, or a similar storage service. If you are interested in their container registry, then see Amazon ECR.
If you have an Amazon account with s3, great! If not, then you should jump down to the development section to see how to run a local server to test with. If you want to jump into local usage or (the easiest) using Docker, continue reading below.
Docker Usage
We have provided you with a docker-compose file so that you can easily deploy your own s3 bucket (via Minio) with a client ready to push to it! You should first clone the repository, and cd into the examples/docker folder where the compose file lives.
git clone https://github.com/singularityhub/sregistry-cli
cd sregistry-cli
The docker-compose.yml file in this folder is an example if bringing up an sregistry-cli and a Minio Storage server. For the test, we won’t change the default username and password for minio, but if you are deploying this for beyond testing you should change these values:
...
      environment:                         (------- minio
        MINIO_ACCESS_KEY: minio
        MINIO_SECRET_KEY: minio123
...
        AWS_ACCESS_KEY_ID: minio           (------- sregistrycli
        AWS_SECRET_ACCESS_KEY: minio123
The two sets of environment variables, the top for the minio container, and the bottom for the sregistry-cli container, should match.
We will use the defaults above for testing. The docker image is from Quay.io. You should have docker-compose installed. After downloading the repository, cd into the examples/docker folder, and bring up the image in detached mode (-d).
cd examples/docker
docker-compose up -d
Your images should be up and running:
CONTAINER ID        IMAGE                                COMMAND                  CREATED             STATUS                    PORTS                    NAMES
08d9645b1a99        minio/minio                          "/usr/bin/docker-ent…"   43 seconds ago      Up 42 seconds (healthy)   0.0.0.0:9000->9000/tcp   minio
8f0234f80aa2        vanessa/sregistry-cli:add_aws-push   "tail -F /dev/null"      44 seconds ago      Up 43 seconds                                      sregistrycli
Shell Inside
Shell into the sregistry container first. We will first pull a Docker image.
$ docker exec -it sregistrycli bash
(base) root@c512453bfeed:/code#
Pull from Docker
Pull an image from Docker, we will push this image to our local registry!
SREGISTRY_CLIENT=docker sregistry pull ubuntu:latest
Push to Minio
The minio and aws credentials for the attached minio server are already exported with the container. s3 is also exported as the default client. Let’s now use the client to push the image to the minio endpoint.
$ sregistry push --name test/ubuntu:latest /root/.singularity/shub/library-ubuntu-latest-latest.simg
Created bucket mybucket
[client|s3] [database|sqlite:////root/.singularity/sregistry.db]
[bucket:s3://s3.Bucket(name='mybucket')]
That’s it! Continue reading for local usage. The main difference is that you would need to export the environment variables yourself (these are done for you in the docker-compose file above).
Usage
Before starting the client, you will want to export your s3 base URL. For example, here is how I would do that using the s3 endpoint provided by a Minio Storage Server:
export SREGISTRY_S3_BASE=http://127.0.0.1:9000
If you are using Amazon AWS S3, leave this undefined. Either way, if you have preference for a bucket, export it here too.
export SREGISTRY_S3_BUCKET=mybucket
If you don’t do this, it will default to creating (or using an existing) bucket prefixed with sregistry and a random “Robot Generator” name and number. You’ll also need to export your AWS Credentials and the endpoint you intend to use (here is the example with Minio)
AWS_ACCESS_KEY_ID=xxxxxxxxxxxxx
AWS_SECRET_ACCESS_KEY=xxxxxxxxxxxxxxx
SREGISTRY_S3_BASE=http://127.0.0.1:9000
export AWS_ACCESS_KEY_ID AWS_SECRET_ACCESS_KEY SREGISTRY_S3_BASE
If you don’t export these values, you would get an error. Here is an example of starting a shell with the client, and missing a variable.
$ sregistry shell s3
ERROR You must export AWS_ACCESS_KEY_ID
To set s3 as your session backend, you can export the environment variable:
export SREGISTRY_CLIENT=s3
or for a more permanent default, set it like this:
$ sregistry backend activate s3
[activate] s3
Optional Parameter
S3 Signature version
Some environments may not support the current S3 v4 client signature. If you need to use the older S3 v2 signature, you can specify the desired signature using the SREGISTRY_S3_SIGNATURE variable. This parameter is optional. If you do not specify the signatureor specify anything other than a S3 v2 signature, sregistry-cli defaults to ‘s3v4’
To use a S3 v2 signature:
export SREGISTRY_S3_SIGNATURE=s3
Push
Once you have exported the variables above, the first thing you likely want to do is push a container to your registry. If you haven’t activated the s3 backend, you could do either of the following:
$ SREGISTRY_CLIENT=s3 sregistry push --name vanessa/pusheena:pancake /home/vanessa/Desktop/ubuntu.simg
$ sregistry push --name s3://vanessa/pusheena:tacos /home/vanessa/Desktop/ubuntu.simg
If you have set a default, then you don’t need to specify s3 either by environment or prefix of the name:
$ sregistry push --name vanessa/pusheena:icecream /home/vanessa/Desktop/ubuntu.simg
By default, no access control list (ACL) will be attached to the image as it gets added to the bucket.
To set such an ACL, use the SREGISTRY_S3_OBJECT_ACL environment variable to an appropriate value such as public-read, before pushing the image. Keep in mind that setting ACLs on objects requires the s3:PutObjectAcl access policy permission to be associated with the AWS credentials.
Once you’ve pushed, you can refresh the interface to see your containers.
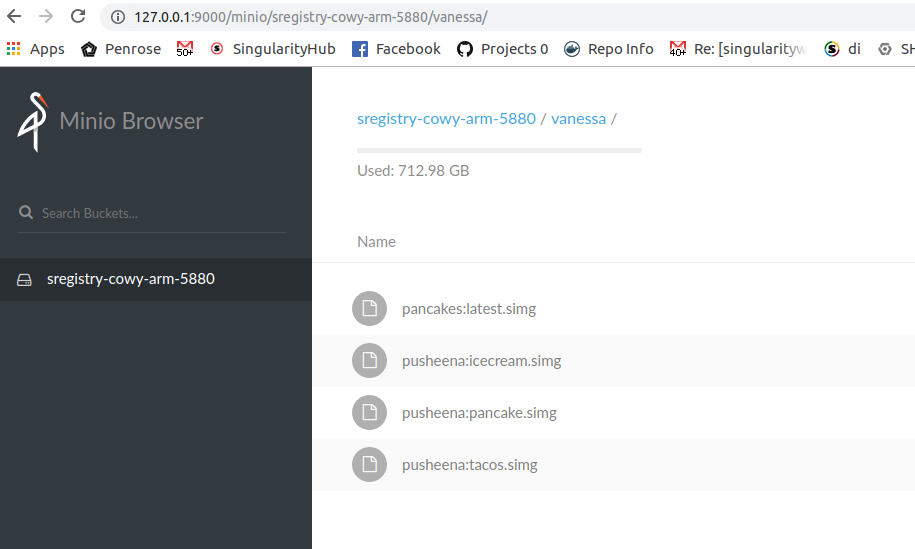
Search
Great, we’ve pushed some images! Now without the interface, how do we remember that they are there?
$ sregistry search vanessa/pancakes
[client|s3] [database|sqlite:////home/vanessa/.singularity/sregistry.db]
[bucket:s3://s3.Bucket(name='sregistry-cowy-arm-5880')]
Containers vanessa
1  vanessa/pancakes:latest.simg	12-21-2018
2  vanessa/pusheena:icecream.simg	12-21-2018	26MB
3  vanessa/pusheena:meatball.simg	12-21-2018	26MB
4  vanessa/pusheena:pancake.simg	12-21-2018
5  vanessa/pusheena:tacos.simg	12-21-2018
Pull
Let’s say we want to pull the first image. We can do that easily.
$ sregistry pull vanessa/pusheena:icecream.simg
$ sregistry pull vanessa/pusheena:icecream.simg
[client|s3] [database|sqlite:////home/vanessa/.singularity/sregistry.db]
[bucket:s3://s3.Bucket(name='sregistry-cowy-arm-5880')]
[container][new] vanessa/pusheena-icecream
Success! /home/vanessa/.singularity/shub/vanessa-pusheena-icecream.simg
Shell
All of the actions above are also available from a shell!
$ sregistry shell s3
client.push('/home/vanessa/Desktop/ubuntu.simg', name='vanessa/pancakes')
Development
We are going to be using the Minio Server as our storage that is akin to S3. Thankfully, we can run it easily with Docker!
docker run -p 9000:9000 -e MINIO_ACCESS_KEY=minio -e MINIO_SECRET_KEY=minio123 minio/minio server /data
It will literally spit out some lovely notes about where to find it:
Endpoint:  http://172.17.0.2:9000  http://127.0.0.1:9000

Browser Access:
   http://172.17.0.2:9000  http://127.0.0.1:9000

Object API (Amazon S3 compatible):
   Go:         https://docs.minio.io/docs/golang-client-quickstart-guide
   Java:       https://docs.minio.io/docs/java-client-quickstart-guide
   Python:     https://docs.minio.io/docs/python-client-quickstart-guide
   JavaScript: https://docs.minio.io/docs/javascript-client-quickstart-guide
   .NET:       https://docs.minio.io/docs/dotnet-client-quickstart-guide
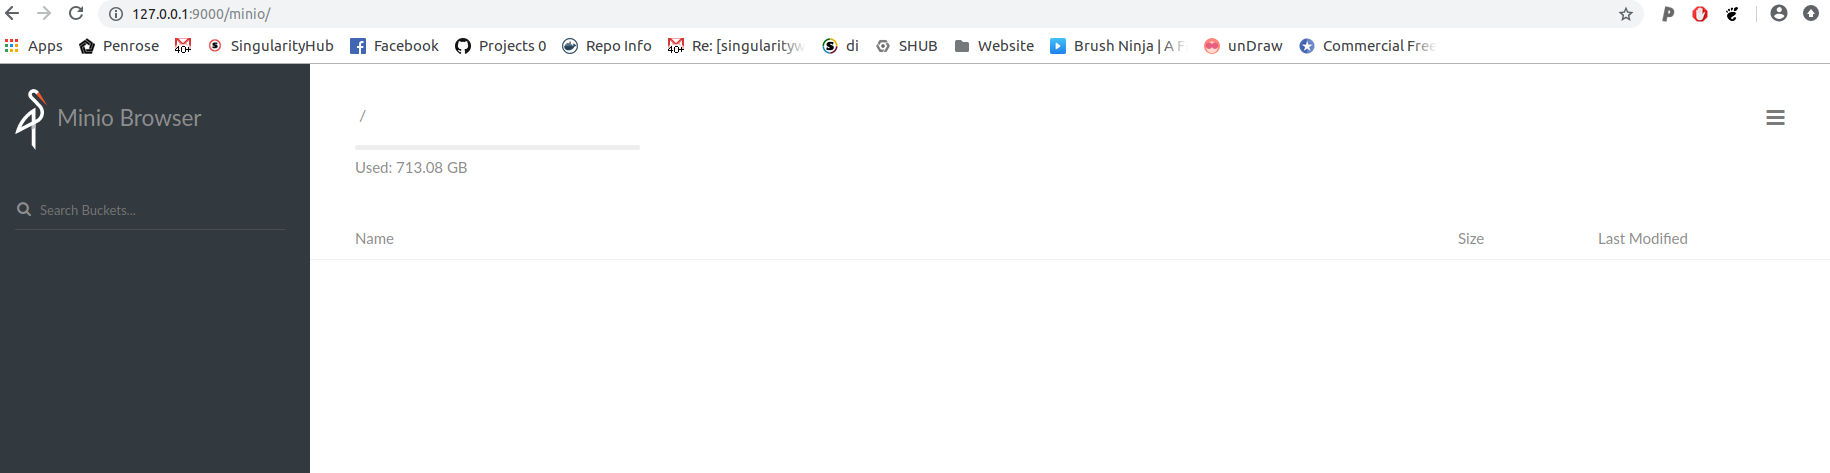
Let’s follow the instructions and navigate to http://127.0.0.1:9000. You should see the Minio storage portal. Note that the mapping is from the internal http://172.17.0.2:9000 to the same port on localhost, so if you omit this step you should follow the instructions and go there. If you did the mapping, Minio should be available at both addresses.
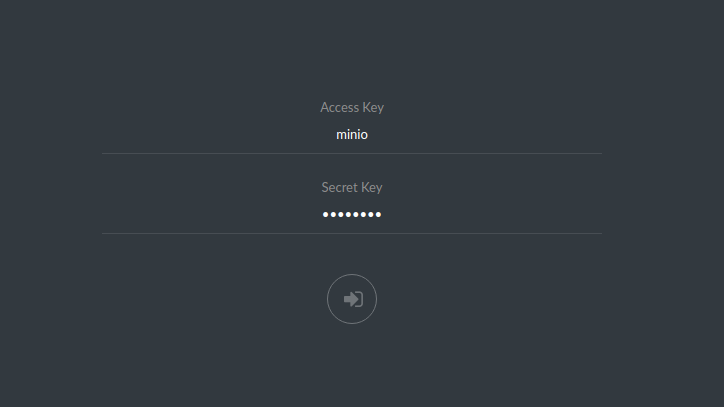
See the MINIO_ACCESS_KEY and MINIO_SECRET_KEY that we entered when we ran the container? Enter them in the portal above! And look at the minio bird, he’s adorable.

Then you should be able to see the Minio storage portal. Congratulations you’re done! Now you can go back and interact with it using the sregistry client.
Thanks to @fenz in this issue for reaching out to suggest this client!
Then you can continue with the tutorial, and use the Minio specific credentials for the client:
SREGISTRY_S3_BASE=http://127.0.0.1:9000
AWS_ACCESS_KEY_ID=minio
AWS_SECRET_ACCESS_KEY=minio123
export AWS_ACCESS_KEY_ID AWS_SECRET_ACCESS_KEY SREGISTRY_S3_BASE
Once you have these exported, you can start using the client! Here is a shell.
$ sregistry shell s3
Created bucket sregistry-cowy-arm-5880
[client|s3] [database|sqlite:////home/vanessa/.singularity/sregistry.db]
[bucket:s3://s3.Bucket(name='sregistry-cowy-arm-5880')]
Python 3.6.4 |Anaconda custom (64-bit)| (default, Jan 16 2018, 18:10:19)
Type 'copyright', 'credits' or 'license' for more information
IPython 6.2.1 -- An enhanced Interactive Python. Type '?' for help.