Singularity Global Client: Google Build
These sections will detail use of the Google Build client for sregistry, which means using
the Google Build API to build a container, and then sending it to Google Storage.
If you are interested in just pushing a container to Google Storage, see the
google-storage client.
Getting Started
If you are using the sregistry image, the client is likely already installed. If you want to install this natively (or build a custom container) the command to install the module extras is:
pip install sregistry[google-build]

# or locally
git clone https://www.github.com/singularityhub/sregistry-cli.git
cd sregistry-cli
pip install -e .[google-build]
The next steps we will take are to first set up authentication, and then define your Storage Bucket (and other settings) via environment variables. The main difference between Google Build and other clients is that since we are building containers remotely, the “push” command is out of scope (and you would use push with the google-storage client to handle instead.
Environment
Singularity Registry Global Client works by way of obtaining information from the environment, which are cached when appropriate for future use. For Google Build, you will first need to set up authentication by following those steps. It comes down to creating a file and saving it on your system with the variable name GOOGLE_APPLICATION_CREDENTIALS. This variable will be found and used every time you use the storage Client, without needing to save anything to the secrets.
Thus, only required variable is the following:
- GOOGLE_APPLICATION_CREDENTIALS should point to the file provided.
SREGISTRY_GOOGLE_PROJECTshould be the name of your Google Project.
Optional variables include:
SREGISTRY_GOOGLE_BUILD_CACHE: after build, do not delete intermediate dependencies in cloudbuild bucket (keep them as cache for rebuild if needed). Defaults to being unset, meaning that files are cleaned up. If you export this as anything, the build files will be cached.SREGISTRY_GOOGLE_BUILD_SINGULARITY_VERSION: if you want to specify a version of Singularity. The version must coincide with a container tag hosted under singularityware/singularity. The version will default to the latest release,3.0.2-slimIf you want to use a different version, update this variable.- SREGISTRY_GOOGLE_STORAGE_BUCKET: is the name for the bucket you want to create. If not provided, we use your username prefixed with “sregistry-“. Additionally, a temporary bucket is created with the same name ending in _cloudbuild. This bucket is for build time dependencies, and is cleaned up after the fact.
SREGISTRY_GOOGLE_STORAGE_PRIVATE: by default, images that you upload will be made public, meaning that a user that stumbles on the URL (or has permission to read your bucket otherwise) will be able to see and download them. If you want to make an image private (one time or globally with an export in your bash profile) you should export this variable as some derivative of yes/true. If no variable is found, images are made public by default. If you set the variable once, it will be saved in your configuration for all subsequent images.
For a detailed list of other (default) environment variables and settings that you can configure, see the getting started pages. For the globally shared commands (e.g., “add”, “get”, “inspect,” “images,” and any others that are defined for all clients) see the commands documentation. Here we will review the set of commands that are specific to the Google Storage client:
- bulid:
[remote]build a container remotely, and save to Google Storage. - pull:
[remote->local]pull an image from Google Storage to the local database and storage. - search:
[remote]list all image collections in Google Storage
For all of the examples below, we will export our client preference to be google-build
SREGISTRY_CLIENT=google-build
export SREGISTRY_CLIENT
but note that you could just as easily define the variable for one command:
SREGISTRY_CLIENT=google-build sregistry shell
Build
Let’s get off to a running start and build! We have two options for building:
- Build from a Local Recipe
- Build from a GitHub repository
- More Complicated Builds
The second is recommended, as it is more reproducible, but there are use cases for both. You can continue reading below, or watch the tutorial here:
1. Build from a Local Recipe
Note that we have a build recipe in the present working directory, and we also want to provide the context (all the recursive files that are alongside and below it). Let’s ask for help first:
$ sregistry build --help
usage: sregistry build [-h] [--preview] [--name NAME] [--outfile OUTFILE]
                       [commands [commands ...]]

positional arguments:
  commands           Google Cloud Build + GitHub
                     --------------------------------------------------------
                     build [recipe] [repo]
                     --------------------------------------------------------
                     Google Build + Storage
                     --------------------------------------------------------
                     build [recipe] [context] build [recipe] . build [recipe]
                     relativefile1 relativefile2

optional arguments:
  -h, --help         show this help message and exit
  --preview, -p      preview the parsed configuration file only.
  --name NAME        name of image, in format "library/image"
  --outfile OUTFILE  name of output file to write contents to
Don’t forget to export these variables:
export SREGISTRY_CLIENT=google-build
export SREGISTRY_GOOGLE_PROJECT=my-project
export GOOGLE_APPLICATION_CREDENTIALS=/path/to/application-credentials.json
Now let’s launch a build, and provide the entire present working directory as context. Notice that we
haven’t exported SREGISTRY_GOOGLE_BUILD_CACHE=yes so we won’t save intermediate build files.
Example Recipe
Let’s say we’ve created a folder called “test” and added some Singularity recipe in it. If you have local filesystem dependencies (files to add to the container), put them in this folder. Here is the recipe - this is just about the simplest and smallest you can get:
Bootstrap: docker
From: busybox:latest
Next, cd into the folder and run the build. Note that we don’t end with “.” so we only need the Singularity recipe as a build context.
$ cd test

# sregistry build --name <name> <recipe> <context>
$ sregistry build --name vanessa/llama Singularity
The above says “Build a container with name vanessa/llama using the Singularity recipe.”
We are assuming that you’ve exported the SREGISTRY_CLIENT to be “google-build”,
but if you haven’t done this, you can specify it on the fly:
$ sregistry build --name google-build://vanessa/llama Singularity
The tags defaults to latest. If we had other dependencies to upload in the folder, you could do either:
$ sregistry build --name vanessa/llama Singularity .
$ sregistry build --name vanessa/llama Singularity file1 file2
Then you’ll see the build package generation (the dependency files from the present working directory), the upload (in the case that the files were not cached from a previous build) and then the build progressing from having status QUEUED, to WORKING, to (hopefully) SUCCESS. The message is updated every 15 seconds.
$ sregistry build --name vanessa/llama Singularity
[client|google-build] [database|sqlite:////home/vanessa/.singularity/sregistry.db]
[bucket][sregistry-gcloud-build-vanessa]
LOG Generating build package for 1 files...
LOG Uploading build package!
PROJECT singularity-static-registry0/0 MB - 00:00:00
BUILD 0 singularityware/singularity:v3.2.1-slim
LOG build 6ddcab9f-22a6-426c-a071-e09970b7ed88: QUEUED
LOG build 6ddcab9f-22a6-426c-a071-e09970b7ed88: WORKING
LOG build 6ddcab9f-22a6-426c-a071-e09970b7ed88: WORKING
LOG build 6ddcab9f-22a6-426c-a071-e09970b7ed88: WORKING
LOG build 6ddcab9f-22a6-426c-a071-e09970b7ed88: SUCCESS
LOG Total build time: 60.98 seconds
MD5HASH 86m3Y2FSERgq5gy5D9rYOA==
SIZE 28000256
SUCCESS gs://sregistry-gcloud-build-vanessa/vanessa/llama-latest/llama.sif
LOGS https://console.cloud.google.com/gcr/builds/6ddcab9f-22a6-426c-a071-e09970b7ed88?project=287055059824
URL https://storage.googleapis.com/sregistry-gcloud-build-vanessa/vanessa/llama-latest/llama.sif
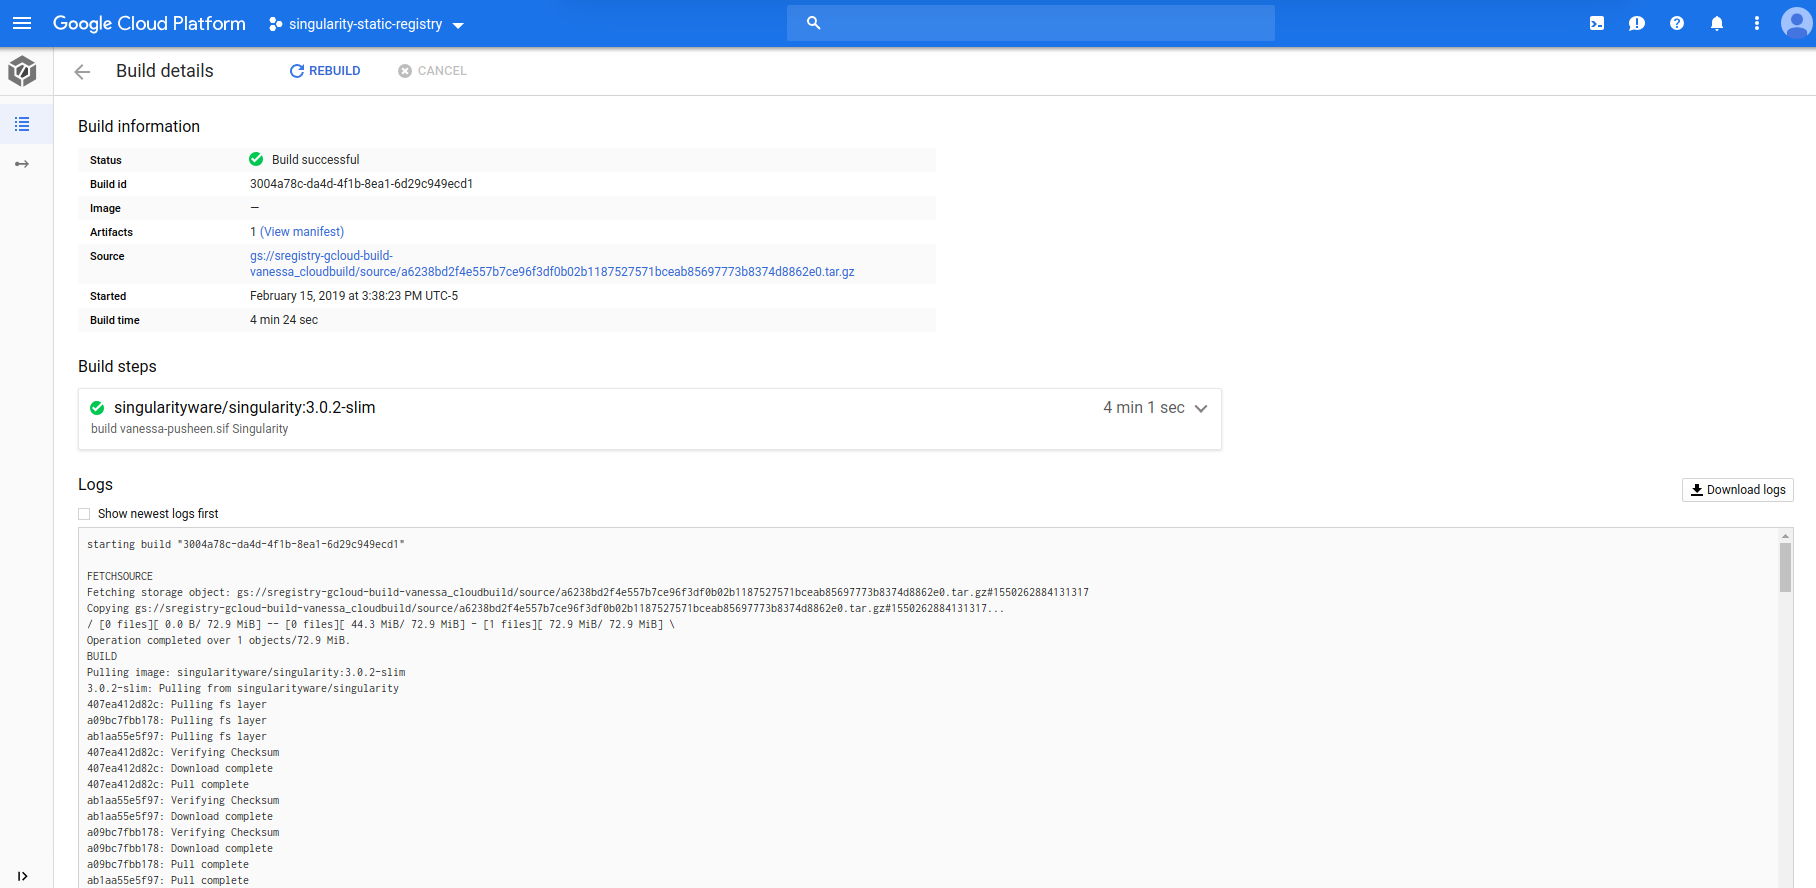
When the build finishes, if you haven’t exported SREGISTRY_GOOGLE_STORAGE_PRIVATE and the
container is public, it will show you the public link to the container (a direct link),
and the Google Cloud Console link to view output logs. You are encouraged to look at the
logs page, as there is a lot of meaningful information here, especially if you need to debug your build!
Given the https link, you can directly pull and run the container using Singularity:
$ singularity pull https://storage.googleapis.com/sregistry-gcloud-build-vanessa/vanessa/llama-latest/llama.sif
WARNING: Authentication token file not found : Only pulls of public images will succeed
 756.00 KiB / 756.00 KiB [================================================================================================================] 100.00% 30.79 MiB/s 0s
$ singularity inspect llama.sif
==labels==
org.label-schema.build-date: Wednesday_5_June_2019_17:34:53_UTC
org.label-schema.schema-version: 1.0
org.label-schema.usage.singularity.deffile.bootstrap: docker
org.label-schema.usage.singularity.deffile.from: ubuntu
org.label-schema.usage.singularity.version: 3.2.1-1
If you use the interactive (from within Python) method, you are also returned this direct
link to the container (response['public_url']) and you are free to put that in whatever
database you are using to keep track of your containers. This is shown in the next section Shell.
If you want to search your storage later, see Pull.
Logs
If you are working in a headless environment, you can capture the final URL, LOGS url,
size, and hash in an output file with the --outfile flag:
$ sregistry build --name vanessa/yomamma --outfile output.txt Singularity
This is useful for continuous integration settings that expect the terminal to be updated, but also would need to return the results to you, the user. Here is the file that we could easy parse:
$ cat output.txt
MD5HASH 4ajv9NRMHCx538ZyjQimvA==
SIZE 28000256
SUCCESS gs://sregistry-gcloud-build-vanessa/vanessa/yomamma-latest/yomamma.sif
LOGS https://console.cloud.google.com/gcr/builds/1821be41-6bce-41f5-9177-319906d12223?project=287055059824
URL https://storage.googleapis.com/sregistry-gcloud-build-vanessa/vanessa/yomamma-latest/yomamma.sif
Here is how you can easily parse these values:
if grep -q SUCCESS output.txt; then
    container_size=$(cat output.txt | grep SIZE | cut -d' ' -f2)
    digest=$(cat output.txt | grep MD5HASH | cut -d' ' -f2)
    url=$(cat output.txt | grep URL | cut -d' ' -f2)
fi
2. Build from a GitHub Recipe
You can also submit a similar job, but have the builder get the recipe file from GitHub. The only difference is specifying a name that begins with your GitHub uri, or saying it directly:
$ sregistry build --name github.com/vsoch/singularity-images Singularity
The tag creation follows the standard of Singularity Hub - you can define a tag based on the extension of the recipe.
$ sregistry build --name github.com/vsoch/singularity-images Singularity.tag
The above assumes that the recipe “Singularity” or “Singularity.tag” lives in the repository root.
If you don’t provide a recipe, it’s assumed to be “Singularity”. Also, do not forget
to have your GOOGLE_APPLICATION_CREDENTIALS and SREGISTRY_GOOGLE_PROJECT
export in the environment. It will not work without them.
Shell
Next, let’s do this from the interactive shell. Note that we have exported SREGISTRY_CLIENT above, as we are looking to interact with a shell for the google-build sregistry client.
sregistry shell google-build://

[client|google-build] [database|sqlite:////home/vanessa/.singularity/sregistry.db]
[bucket][sregistry-gcloud-build-vanessa]
Python 3.6.4 |Anaconda custom (64-bit)| (default, Jan 16 2018, 18:10:19)
Type 'copyright', 'credits' or 'license' for more information
IPython 6.2.1 -- An enhanced Interactive Python. Type '?' for help.

In [1]:
Here we see straight away that we are using the default bucket name
(sregistry-gcloud-build-vanessa) and the google-build client.
The printing of the bucket on the first line indicates we successfully connected to it,
and we’ve also connected to the bucket of the same name ending with _cloudbuild (sregistry-gcloud-build-vanessa_cloudbuild). If you want to import the client within python, you can do that too:
from sregistry.main.google_build.client import get_client
client = get_client()
Either way, we just need to provide the same arguments to the function to run the build. If you don’t have files other than the Singularity recipe, you don’t need to define a context.
> recipe = "Singularity"
> name = 'vanessa/avocados'    # The name of the container to build, tag is optional and defaults to latest

> response = client.build(name=name,
                          recipe=recipe)
If you have a context, just specify it.
> recipe = "Singularity"
> context = '.'                # All files in present working directory and below (optional)
> name = 'vanessa/avocados'    # The name of the container to build, tag is optional and defaults to latest

> response = client.build(name=name,
                          recipe=recipe,
                          context=context)
Or if you want to specify a different working directory (that is removed from the path of the recipe and any files provided with “context” you can do that too:
> recipe = "/tmp/test/Singularity"
> name = 'vanessa/avocados'

> response = client.build(name=name,
                          recipe=recipe,
                          working_dir="/tmp/test")
In the above example, we want the builder’s present working directory to be
/tmp/test, so the recipe will be stripped of this path. If you are building
with a recipe that is a relative path or in the present working directory,
you shouldn’t need to do this given that the builder expects the same path. The output will be the same as shown previously. You are again encouraged to look at the logs
link if the build isnt’ a success. With the interactive shell mode, you can also provide the preview argument to just inspect the configuration for the build:
> config = client.build(name=name,
                        recipe=recipe,
                        preview=True)
{
    "steps": [
        {
            "args": [
                "build",
                "avocados.sif",
                "Singularity"
            ],
            "name": "singularityware/singularity:v3.2.1-slim"
        }
    ],
    "source": {
        "storageSource": {
            "bucket": "sregistry-gcloud-build-vanessa_cloudbuild",
            "object": "source/90442580933f3a3c3f90c0ed392266cb792255654296b8f386229b36b3c3037b.tar.gz"
        }
    },
    "artifacts": {
        "objects": {
            "location": "gs://sregistry-gcloud-build-vanessa/vanessa/avocados-latest/",
            "paths": [
                "avocados.sif"
            ]
        }
    }
}
Check out how the configuration changes when we use the function to build from Github:
> config = client.build_repo(repo='github.com/vsoch/singularity-images',
                             recipe="Singularity",
                             preview=True)
{
    "steps": [
        {
            "args": [
                "clone",
                "https://github.com/vsoch/singularity-images",
                "."
            ],
            "name": "gcr.io/cloud-builders/git"
        },
        {
            "args": [
                "build",
                "singularity-images.sif",
                "Singularity"
            ],
            "name": "singularityware/singularity:v3.2.1-slim"
        }
    ],
    "artifacts": {
        "objects": {
            "location": "gs://sregistry-gcloud-build-vanessa/github.com/vsoch/singularity-images/latest/",
            "paths": [
                "singularity-images.sif"
            ]
        }
    }
}
You’ll notice that the first step is to clone the repository. If we provided a branch or commit as argument, the following step would be to check it out. We then build again, and save the image to storage.
3. More Complicated Builds
If you are working on a server environment, you may not want to build from the present working directory (the active directory of your application) and you might not want to rely on the environment for discovering variables. In this case, you have other options.
Client Envars
Before instantiating a client, you can provide as many of the environment variables and provide them in a dictionary.
# Provide all envars directly to client instead of environment
context = {'GOOGLE_APPLICATION_CREDENTIALS': GOOGLE_APPLICATION_CREDENTIALS,
           'SREGISTRY_GOOGLE_PROJECT': SREGISTRY_GOOGLE_PROJECT}
And then provide them to the get_client function:
from sregistry.main.google_build.client import get_client
client = get_client(debug=True, **context)
Pull and Search
Now let’s say that we built an image (some long time ago!) and want to find it in Google
Storage. We would want to pull the image to our local sregistry database.
Search
A search without any parameters will essentially list all containers in the configured storage bucket. But how do we know what is a container?
a container is defined by having the metadata key “type” with value “container” and this is set by the upload (push) client.
Thus, if you do some fancy operation outside of using the client to upload containers to storage, make sure that you add this metadata value, otherwise they will not be found. Let’s do a quick search to get our list in Google Storage. This action has no dependency on a local storage or database. Let’s say we just built the container vanessa/omgtacos:latest. Can we find it?
$ sregistry search
[client|google-build] [database|sqlite:////home/vanessa/.singularity/sregistry.db]
[bucket][sregistry-gcloud-build-vanessa]
[gs://sregistry-gcloud-build-vanessa] Containers
1       27 MB	vanessa/avocados:latest.sif
2       35 MB	vsoch/singularity-images:latest.sif
There it is! Then to look at details for a more specific search, let’s try searching for “vanessa/avocados”
$ sregistry search vanessa/avocados:latest
{}
[client|google-build] [database|sqlite:////home/vanessa/.singularity/sregistry.db]
[bucket][sregistry-gcloud-build-vanessa]
[gs://sregistry-gcloud-build-vanessa] Found 1 containers
vanessa/avocados:latest.sif
id:      sregistry-gcloud-build-vanessa/vanessa/avocados:latest.sif/1559766957015664
name:     vanessa/avocados:latest.sif
updated: 2019-06-05 20:36:13.444000+00:00
size:    27 MB
md5:     j8psLCakQeKfw6xqcy0kqA==
Pull
Finally, let’s say we’ve found the container that we like, and we want to pull it.
$ sregistry pull vanessa/avocados:latest
[client|google-build] [database|sqlite:////home/vanessa/.singularity/sregistry.db]
[bucket][sregistry-gcloud-build-vanessa]
Searching for vanessa/avocados:latest in gs://sregistry-gcloud-build-vanessa
Progress |===================================| 100.0%
[container][update] vanessa/avocados-latest@1e38ac7437da5afbfd89937115f052e0
Success! /home/vanessa/.singularity/shub/vanessa/avocados/latest@8fca6c2c26a441e29fc3ac6a732d24a8.sif
and if we list images, we see our container:
$ sregistry images
Containers:   [date]   [client]	[uri]
1  February 15, 2019	   [google-build]	vanessa/avocados:latest@8fca6c2c26a441e29fc3ac6a732d24a8
The different versions (of the same name and tag) are listed. To get a path to any of the files:
$ sregistry get vanessa/avocados:latest@8fca6c2c26a441e29fc3ac6a732d24a8
/home/vanessa/.singularity/shub/vanessa/avocados/latest@8fca6c2c26a441e29fc3ac6a732d24a8.sif
You can also see in the pull output that on the backend of pull is the same search as you did before. This means that if you want to be precise, you should ask for the complete uri (version included). If you aren’t precise, it will do a search across name fields and give you the first match. Be careful, my linux penguins.
For debugging scripts, see Google Cloud Debugging.